Web-based Distributed Authoring and Versioning, or WebDAV, is an extension of the HTTPS protocol that allows you to create a connection between your local computer and a server to easily transfer files between machines. After establishing a WebDAV connection, it is almost as easy to use files on the dotCMS server as those stored in local directories.
WebDAV Folder Connection Types & Multilingual File Support
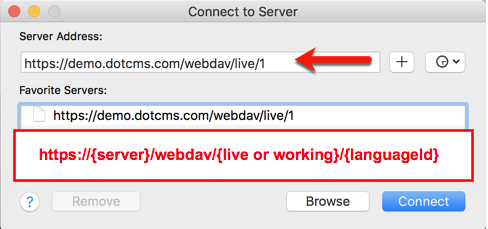
The URL format for your webdav connection is https://{server}/webdav/{live or working}/{languageid}, where server is either your server name (e.g. demo.dotcms.com) or the IP address of your server. Live establishes a connection that will publish (permissions permitting) uploaded files, and working creates a connection that will save (unpublished) uploaded files.
Multilingual Files
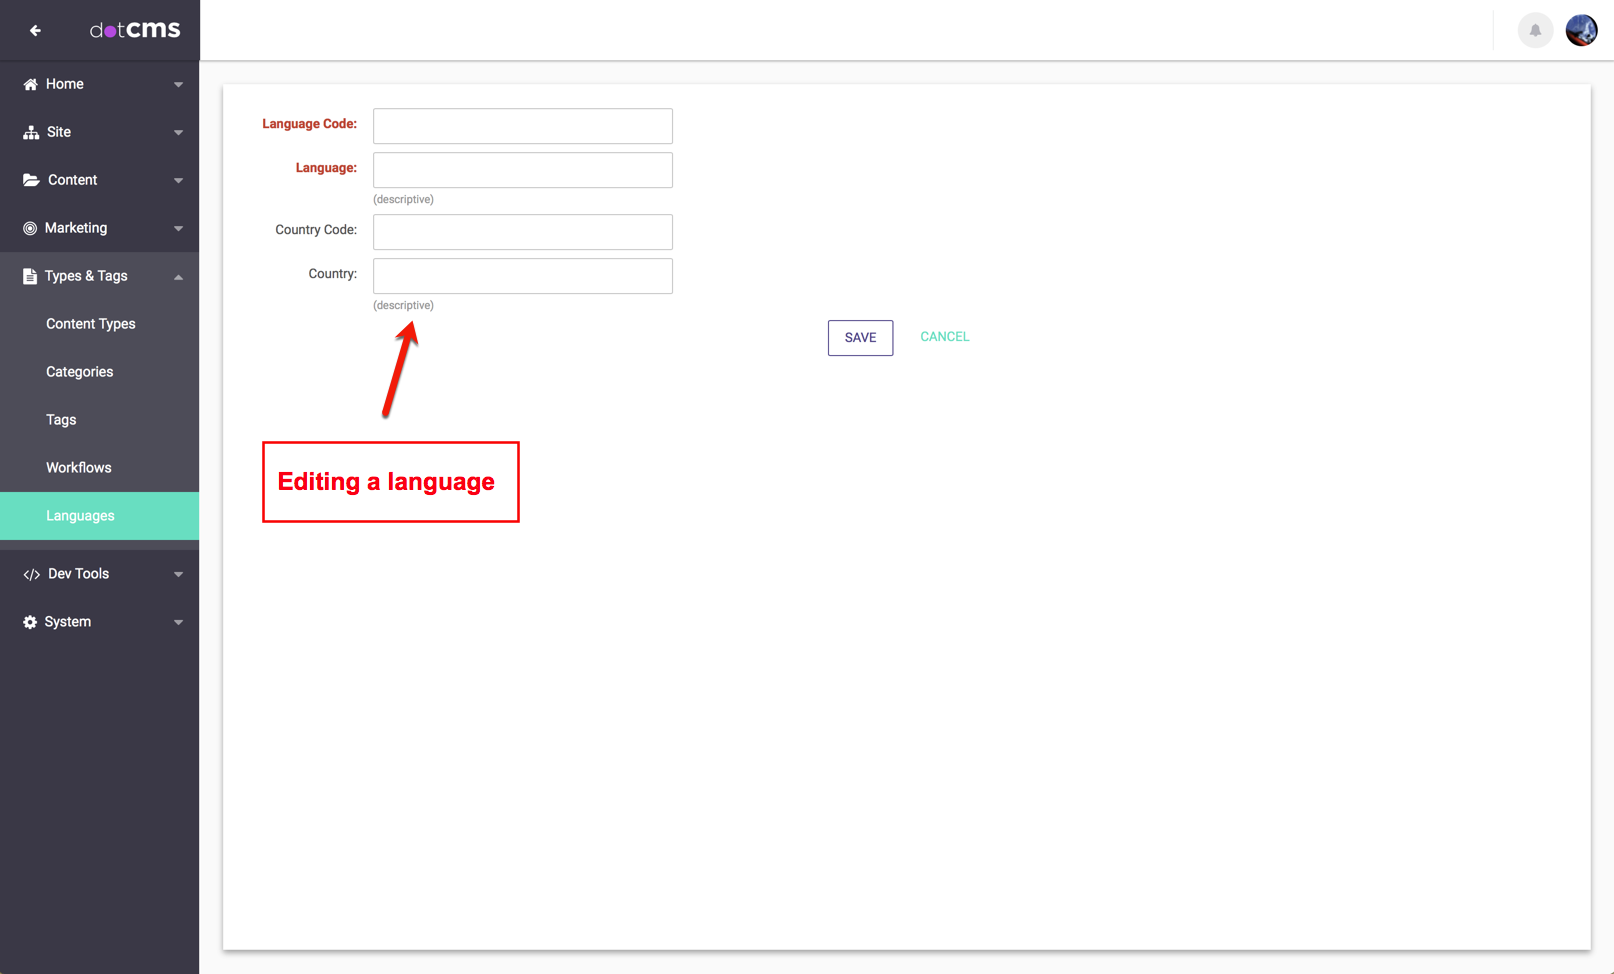
At the end of either of the two separate WebDAV folder connection paths a numeric language id parameter is required. This helps identify the language version of the file that should be saved/published. The numeric parameter provided should correspond to the value of the language id visible when editing the language under the dotCMS System→Languages tab:
Example: Publish [live] connection using the default language
The URL to publish content in the default language is /webdav/live/1.
Files uploaded to this folder are automatically published in the default language configured for your dotCMS server as soon as the upload is complete.
Updating existing files: When you upload a file under this folder, and a file of the same name already exists, a new version of the file is created in the indicated language version, and that version is immediately published.
Note:
- If you are using [Push Publishing], the uploaded file is not automatically pushed to any other servers.
- You must manually initiate a push through the dotCMS backend.
- dotCMS ships configured for English as the default language.
- For information on how to change the default language, please see the System Language Properties documentation.
Example: Save [working] connection using an alternate language
The URL to save content in a language other than the default language is /webdav/working/{language_id}, where {language_id} must be replaced by the language id of the desired language.
- Example: If the language id of Spanish is 2, the path to the webdav folder to save Spanish content is
/webdav/working/2.
Files uploaded to the working folder are not published, only saved as draft versions. To publish the files, you must login to the dotCMS backend, and publish the files through the dotCMS administration interface. This kind of connection should be set up for users who do not have role permissions to publish the files they are uploading.
Updating existing files: If you copy a file to the working folder, and a file of the same name already exists, a new working (unpublished) version of the file is created in the indicated language version.
Special Notes
It is important to understand the following two special notes, especially for customers upgrading from dotCMS 3.5 or earlier to dotCMS 3.6 and above.
Legacy WebDAV Pathing
Prior to dotCMS version 3.6, the dotCMS webdav connection did not support multi-lingual file uploading.
Prior webdav connection formatting had only two upload folders: /webdav/autopub (to automatically publish uploaded files), and /webdav/nonpub (to save unpublished versions of uploaded files). Both of these folders published uploaded content in the default language only. To restore the previous behavior for compatibility with older versions and processes, add the following property to the dotmarketing-config.properties file (through a configuration plugin) and set it to true:
WEBDAV_LEGACY_PATHING = true
Note:
- It is strongly recommended that all changes to the dotmarketing-config.properties property be done through a properties file extension.
- The
WEBDAV_LEGACY_PATHINGproperty does not exist in the dotmarketing-config.properties file that ships with dotCMS.- Copy the property from this document (above) to add it to your configuration plugin.
For more information on legacy webdav functionality, please see the dotCMS 3.5 Webdav documentation.
Empty File Handling
By default, dotCMS does not allow empty file uploading via WebDAV connection, the Site Browser, or Push Publishing bundles. Attempting to upload and empty file will fail and an exception will appear in the dotCMS log.
For more information, see the Empty File Handling configuration information in the File Configuration documentation.
Accessing dotCMS with WebDAV
How you access WebDAV connection to your sites/folders varies depending on the operating system of the client used to connect to your dotCMS server. The following instructions explain how to set up a WebDAV client connection on different operating systems:
Setting up WebDAV on Windows
You may access dotCMS WebDAV folders on Windows in one of 3 ways:
- As a Windows network drive.
- Directly from Windows Explorer.
- Using a 3rd party WebDAV client (such as Cyberduck).
Notes:
- Although you can access WebDAV folders using Windows, it may require some special configuration, there are some important considerations to understand, and even after all that it still may not be reliable on some Windows machines.
- Therefore if you plan to use WebDAV for significant dotCMS configuration from a Windows machine, or if you run into any issues configuring WebDAV using the Windows WebDAV functionality, we recommend you use Cyberduck or another 3rd party WebDAV client instead.
- If you choose to use WebDAV using the Windows WebDAV functionality, please make sure to read Important Windows Considerations, below.
Important Windows Considerations
There are two issues that require special care when using WebDAV with Windows. These issues are not with dotCMS but with Windows OS Software.
1. Required Download for Windows 7, Windows Server 2003, Windows Vista, and Windows XP
To set up webDAV for versions of Windows older than Windows 8, you must first install the Microsoft Software Update for Web Folders (KB907306). In addition to fixing issues when using web folders, this patch also includes several security enhancements.
Note:
- The download link for this update is no longer available on the Microsoft site.
- Mirrored copies of the update may be found on CNET.com or with a web search.
2. File Request Timeouts
The Windows operating system may place a limitation on the time for each WebDAV request, automatically timing out any request that takes longer than 20 seconds. Windows considers the copying of a folder with a large number of files as a single request, so WebDAV actions on folders may time out.
So to avoid time out errors when moving large numbers of files, it is best to move, copy, or paste the individual files instead of attempting to work with entire folders. Multiple files may be selected and copied, pasted etc. at the same time (you do not need to drag and drop each file individually). But when you work with groups of selected files instead of folders, Windows considers each individual file a separate copy request, each with its own 20 second time limit. This reduces the likelihood of time out errors when using WebDAV with Windows.
Windows Method 1: Map a Network Drive
You may map the dotCMS WebDAV folder to a Windows Network Drive to simplify repeated access.
- Select Computer from the Start menu, or navigate to Computer in Windows Explorer.
- From the Windows Explorer ribbon, select Map network drive.
- Select the drive letter you want to use.
- In the Folder field, type the full URL of the dotCMS WebDAV folder you wish to map (replace server in the following folder names with the URL or IP address of your dotCMS server):
- https://{server}:{port}/webdav/live/{languageid} to connect and publish files of a specific language version.
- https://{server}:{port}/webdav/working/{languageid} to connect and save (without publishing) files of a specific language version.
- Important: You must include the port number when specifying the path.
- Check both the Reconnect at logon and Connect using different credentials boxes.
- Press Finish.
A Windows Security dialog box will open, prompting you to login. In it do the following:
- Enter your dotCMS User Name and Password.
- Check the Remember my credentials box.
- Press OK.
Windows Method 2: WebDAV Folder Address in Windows Explorer
You may also access the dotCMS Webdav folders directly by typing into the Explorer address bar. The address to type in will be in the following form:
\server@SSL@port\webdav\{live or working}\{languageId}
Using the following components:
| Component | Necessity | Description |
|---|---|---|
server | Required | Address of the server (server name or IP address). |
@SSL | Optional | If included, use SSL to connect. |
@port | Optional | Port number to connect to Webdav. Note: This is optional only if you are using a standard port (443); if you are using any other port, this is required. |
\\webdav | Required | The root of the dotCMS webdav folder. (Specifying any other folder will fail, and dotCMS will reject the connection). |
\{live or working} | Required | The type of dotCMS Webdav connection to use (e.g. \\live or \\working).Please see dotCMS WebDAV Folders, above. |
\\{LanguageId} | Required | The language id of the language version of files to access (e.g. \\1 to access files in the default language). |
Whether you access WebDAV via a mapped drive or by directly typing the address into the Explorer address bar, you should be able to open folders on your dotCMS host and drag and drop files to and from those folders in the same way that you transfer files between local Windows folders.
Setting up WebDAV on MacOS
You can set up WebDAV on MacOS using either Cyberduck or MacOS Finder.
Cyberduck
To set up WebDAV using Cyberduck on MacOS:
1. Download and install the Cyberduck open source software
You can download Cyberduck from either of the following websites:
- The Cyberduck Home Page (https://cyberduck.io/).
- You may download versions for both iOS and Windows from this site.
- Cyberduck on the MacApp Store.
2. Open Cyberduck
3. Establish the Connection to dotCMS
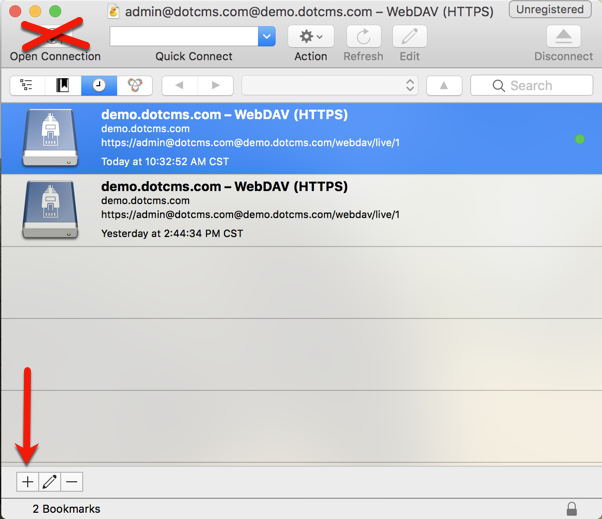
Click the + icon in the bottom left corner of the application window.
Note: Depending on your version of Cyberduck, the Open Connection icon in the upper left corner of the application window may not give you the options you need to be able to configure the connection properly.
In the Connection window, use the steps as pictured in the following screenshot:
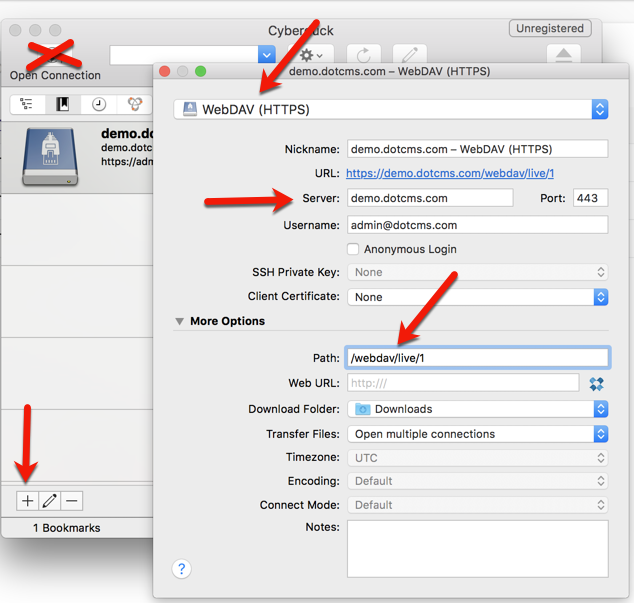
- Click the Protocol drop down list and select WebDAV (Web-based Distributed Authoring and Versioning).
- In the Server field type the domain of your website (e.g. demo.dotcms.com).
- In the Port field, type 443.
- Enter the Username and Password login information for your dotCMS user account.
- Note: Make sure to include the domain name of the email address in the username, if it's required to login to your dotCMS backend.
- Click More Options to expand advanced options
- Enter the dotCMS WebDAV folder you wish to access:
- /webdav/live/1 (auto-publish default language files)
- /webdav/working/1 (auto-save unpublished default language files)
- Click Connect.
Once the connection is established, you should be able to open folders on your dotCMS host and drag and drop files to and from those folders in the same way that you transfer files between local MacOS folders.

MacOS Finder
Note: We do NOT recommend using Finder for bulk uploading files via WebDAV. CyberDuck is recommended instead, since it is more robust with large data transfers.
Perform the following steps to use MacOS Finder to access dotCMS WebDAV folders:
1. Setup the dotCMS WebDAV Connection in Finder
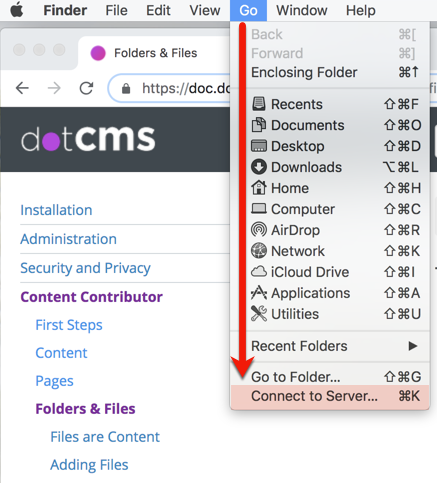
- Open Finder.
- Click Go and then Connect to Server.
- Type the complete URL to the dotCMS WebDAV Folder you wish to access:
- /webdav/live/1 (auto-publish default language files)
- /webdav/working/1 (auto-save unpublished default language files)
- Click Connect.
- Enter the Username and Password login information for your dotCMS user account.
2. Open the Connection
Open the new connection with the name of your website domain (login again if necessary).
You should now be able to drag and drop to the appropriate WebDAV folder on your dotCMS server.
Setting up WebDAV on Linux
1. Download and install davfs2
Download the latest version of davfs2 from the davfs2 download page.
2. Configure the davfs2.conf file.
Make sure the following properties in the file are configured as shown below:
if_match_bug        1
delay_upload        0
use_locks           0
3. Create the mount point.
mkdir /dav
4. Mount a share in the dav directory on your dotCMS server.
For example, to set up a WebDAV connection to dotcms.org at the mount point /dav on your local host, use the following command:
mount -t davfs https://dotcms.org/webdav/live/1 /dav
You will then be prompted for your dotCMS username and password which will give you access to the WebDAV folders on your dotCMS server.
Note:
- You must manually unmount the WebDAV folders when you are finished:
umount /dav